Graduation season is upon us! Here in south-central Montana both high school and university commencements are carried out in shifts at our local fairgrounds and often wrap up by mid-late May. However, I know many other areas of the country are still counting down the days until that last hooray!
This past weekend we were blessed with an opportunity to celebrate 2 homeschool grads and, coming up this weekend, we will shout "congrats" to a long-time family friend who walks her commencement with a local Christian school.
My go-to gifts for graduates usually include a favorite and transformational book (currently, What Every Christian Ought To Know by Adrian Rogers), a snazzy cup or mug, Smarties (cause the graduate is an official "Smarty-pants" now!) and some other little bit of celebratory paraphernalia. This year I chose party poppers.
The tricky part came when I went to shop for gift bags, the Buck Mart (aka, Dollar Store) was sold out... so I decided to get those creative juices flowing...
... and viola, $9 later I had scored all the fixins I needed not just for a few gift bags but also for some pretty impressive gifts and trimmings (with leftovers)!
The gift bags...
Supplies:
gift bags (mine came as a package of 2)
1 package grad decor (mine had 3 signs and 4 tassels strung along a ribbon line)
tissue paper
double-sided sticky tape
The Process:
First, I cut the signs on the line with a few inches hanging down each side...
I had to re-string a few of them so the strings were hanging out the front of the "right side" of the sign.
It was very easy.
I evened up the strands in preparation for tying a bow...
My bow was lopsided so I tucked the right strand (sticking straight up) under the bow so it would stick straight down.
To be sure my bow didn't end up crooked, I applied a small strip of double-sided tape under the center and pressed down to be sure it was secure...
To complete the bow....
I folded and snipped at an angle...
To get that nice little notch!
Then, I applied double-sided sticky tape all along the edges and a few swipes across the middle of the back of the sign.
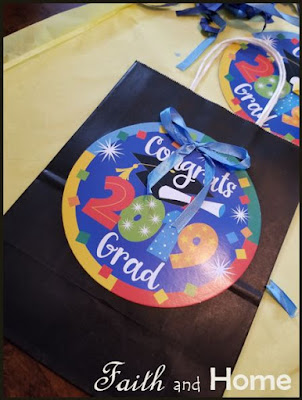
Finally, I lined the sign up to the center of the front of the bag and pressed the taped side firmly place.
Insert goodies and some coordinated tissue paper and there ya go!!
Other Loot
Outside of the book purchases I planned to insert in each bag, the rest of my Buck Mart loot and some of the miscellaneous leftover pieces acted as filler.
"Smarty-pants"!
I used a simple piece of note-pad paper and a felt pen to write our quirky message down.
After filling each cup with a bag of Smarties, I cut the messages into strips and inserted on top.
I used the leftover pompoms from the sign banner as a fun topper to each cup.
The pompoms were placed with the "handle" part up so they would be easy to pull out once the gift was opened.
For the coffee mug, I opted out of the note since the writing on the side says it all!
However, I still inserted another of the left-over pompoms here as well.
And into the bag all the goodies went!
When I was done I had plenty of tissue paper, 1 "Congrats 2019 Grad" sign and 1 pompom left. This concept could be used for any gift-giving situation where you may want to go a little 'outside the box' in your gift wrap! The craziest part? The next bags I do like these will be for my youngest's high school graduation next year!!!
Don't blink!
What ideas do you have for cost-effective gift giving... or wrapping... for graduation (or other special occasions)?
Blessings,

Are you looking for something to help you organize your curriculum scouting for the next school year? My
newsletter for May contained a FREE downloadable PDF packet of
printables designed to help you collect your thoughts! When you sign up
with my FREE e-newsletter I will send you May's issue containing this
and other great material attached! Information below....
*Are you subscribed to my newsletter? You might want to be. Why? Well, the newsletter contains bonus material you won't find on the website... not to mention, in those busy months when I can't get regular blog articles up, you can count on this periodical popping up in your email in-box each last Thursday with all new content! What exactly does the newsletter contain?
I look forward to sharing Faith and Home Times with you!!
This past weekend we were blessed with an opportunity to celebrate 2 homeschool grads and, coming up this weekend, we will shout "congrats" to a long-time family friend who walks her commencement with a local Christian school.
My go-to gifts for graduates usually include a favorite and transformational book (currently, What Every Christian Ought To Know by Adrian Rogers), a snazzy cup or mug, Smarties (cause the graduate is an official "Smarty-pants" now!) and some other little bit of celebratory paraphernalia. This year I chose party poppers.
The tricky part came when I went to shop for gift bags, the Buck Mart (aka, Dollar Store) was sold out... so I decided to get those creative juices flowing...
... and viola, $9 later I had scored all the fixins I needed not just for a few gift bags but also for some pretty impressive gifts and trimmings (with leftovers)!
The gift bags...
Supplies:
gift bags (mine came as a package of 2)
1 package grad decor (mine had 3 signs and 4 tassels strung along a ribbon line)
tissue paper
double-sided sticky tape
The Process:
First, I cut the signs on the line with a few inches hanging down each side...
I had to re-string a few of them so the strings were hanging out the front of the "right side" of the sign.
It was very easy.
I evened up the strands in preparation for tying a bow...
My bow was lopsided so I tucked the right strand (sticking straight up) under the bow so it would stick straight down.
To be sure my bow didn't end up crooked, I applied a small strip of double-sided tape under the center and pressed down to be sure it was secure...
To complete the bow....
I folded and snipped at an angle...
To get that nice little notch!
Then, I applied double-sided sticky tape all along the edges and a few swipes across the middle of the back of the sign.
Finally, I lined the sign up to the center of the front of the bag and pressed the taped side firmly place.
Insert goodies and some coordinated tissue paper and there ya go!!
Other Loot
Outside of the book purchases I planned to insert in each bag, the rest of my Buck Mart loot and some of the miscellaneous leftover pieces acted as filler.
"Smarty-pants"!
I used a simple piece of note-pad paper and a felt pen to write our quirky message down.
After filling each cup with a bag of Smarties, I cut the messages into strips and inserted on top.
I used the leftover pompoms from the sign banner as a fun topper to each cup.
The pompoms were placed with the "handle" part up so they would be easy to pull out once the gift was opened.
For the coffee mug, I opted out of the note since the writing on the side says it all!
However, I still inserted another of the left-over pompoms here as well.
And into the bag all the goodies went!
When I was done I had plenty of tissue paper, 1 "Congrats 2019 Grad" sign and 1 pompom left. This concept could be used for any gift-giving situation where you may want to go a little 'outside the box' in your gift wrap! The craziest part? The next bags I do like these will be for my youngest's high school graduation next year!!!
Don't blink!
What ideas do you have for cost-effective gift giving... or wrapping... for graduation (or other special occasions)?
Blessings,

*Are you subscribed to my newsletter? You might want to be. Why? Well, the newsletter contains bonus material you won't find on the website... not to mention, in those busy months when I can't get regular blog articles up, you can count on this periodical popping up in your email in-box each last Thursday with all new content! What exactly does the newsletter contain?
- Encouraging articles on Faith, Home(making), and Homeschool
- Free printables under different themes each month
- Insider info on the latest goings-ons with all things on my blog and writing related
I look forward to sharing Faith and Home Times with you!!


