NEW BLOG!

NEW BLOG!
THE BLOG HAS MOVED, please visit link in image to see fresh content. Some links and PDF files may no longer work on this site. Many can be found in the Resource page at the new site or you can contact me at amanda@faithandhomepublishing.com if you are looking for a specific resource.
Showing posts with label Gettin' Crafty. Show all posts

Monday, April 8, 2019

Gettin' Crafty with Easter Garland


Here in south-central Montana, spring is beginning to make its presence more evident.  Easter is a few short weeks away and Pinterest is alive with a plethora of creative ideas.  One I have frequently seen is bunny and/or egg garland. 


While visiting the Dollar Store recently I saw the cutest sparkly egg garland but it seemed to need a little something more.  Suddenly all that Pinterest inspiration came rushing in and I snatched a set to dress-up when I got home!
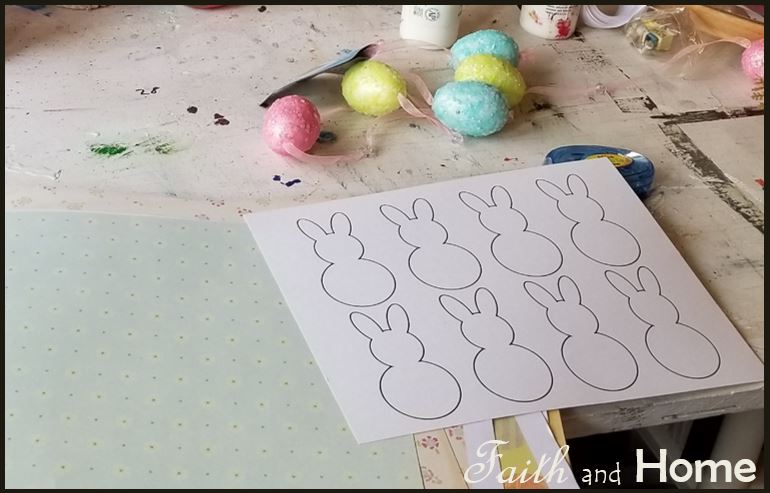
I forget to take a picture of the entire strand before I started the project, these are screen shots off of the video I took!


Here is how it went down:

I designed a bunny template which is available in my FREE monthly newsletter (you can see details for sign up at the end of this post.  If you decide to register, I will try to send this month's edition straight to your in-box within 48 hours).  I printed my template on card stock so it would be sturdier.

I've been collecting scrapbook paper for years and happened to have a sweet set of prints perfect for spring.  I chose a few which seemed to reflect the colors of the egg garland well and gave the line some variety.


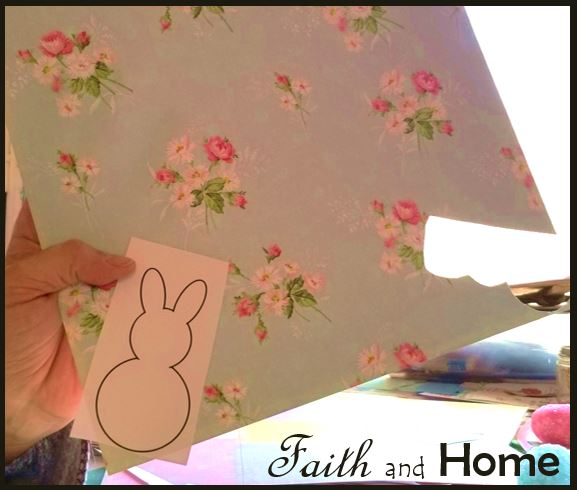
I cut my bunnies out in blocks to separate them and then secured them with a small strip of tape at their 'bottom' on the WRONG side of the scrapbook paper (you will see why in a minute).  I cut them out in this way.
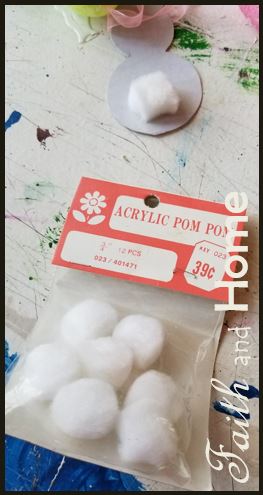
 Once I had all of them cut out they seemed a bit plain.  I remembered the current trend of bunny pom-pom tails so I checked my craft supplies and found a vintage pack of the white fluffy sort.

I used my crafter's tape, applying two small swipes where the "tail" should go and then pressed each pom-pom into place to be sure it was secure. 

PSA:  I LOVE my crafter's tape... it is quite affordable (I bought mine in a multi-pack on Amazon) and it works like a charm (no more waiting for glue to dry!!)

With cotton tails in place, I began to position them along the line in order to verify their desired placement.  Then, I used my handy-dandy crafter's tape along all of the edges and adhered each rabbit into it's respective position. The card stock backing helps the bunny stay upright and creates stability.

Viola!  Ready to hang!

I like this garland because, not only are the eggs in an assortment of beautiful colors, but each is separated by a clear bead which can be slid along the line.  I created a pattern of: egg, bunny, bead, egg.....  However, you could actually un-string all elements of this garland and re-string them differently if you wanted.  Me, I wanted something quick and easy!! 


I filmed the entire process which is still available in saved stories on my Instagram account.  If I hadn't been filming, this project could have been easily done within 30 minutes!

What Pinterest inspired (or self-inspired) Easter decor projects have you tried lately?


Blessings,


You can follow this link in text to visit my Instagram and watch the video.
You can see what I am pinning by following me on Pinterest as well!


Did you like my bunny templates?  They are available as part of a printable set in this month's newsletter.  Info on how to subscribe for your FREE edition is below.  The latest issue will make its way to you when you sign up!


You can click here to see some of the great blogs I am linking up today ...


*Are you subscribed to my FREE monthly newsletter?  You might want to be.  Why?  Well, the newsletter contains bonus material you won't find on the website... not to mention, in those busy months when I can't get regular blog articles up, you can count on this periodical popping up in your email in-box each last Thursday with all new content!  What exactly does the newsletter contain?
  • Encouraging articles on Faith, Home(making), and Homeschool
  • Free printables under different themes each month
  • Insider info on the latest goings-ons with all things on my blog and writing related
You won't find all this great bonus material on the blog so be sure to sign up so you don't miss out!  It's Ok, hop over real quick, right there to your right, see it on my sidebar where it says, "Subscribe to my Newsletter" with a  picture of the "Faith and Home Times" logo above it?  Ok, now enter your email in the box labeled "email address" then click "Subscribe"....(don't worry, it doesn't hurt and I promise not to spam you!). You should receive a confirmation email from me.  

I look forward to sharing Faith and Home Times with you!!

Tuesday, April 2, 2019

Gettin' Crafty with Easter Wreaths


Winter has been long and cold this year, rendering my "she-shed" virtually unusable without layers of gear (not really conducive to the craft savvy!).  Then, finally, spring broke through this past week!  Our little radiator could do its job well while curtains were flung open to let the sunlight flood in and I dusted off those craft supplies for 2 special seasonal projects!  One project I will be sharing today... the other... next week (so stay tuned!)


This project began with a hoop, some dollar store foliage and sign, ribbon, and a spark of inspiration from my youngest who is an avid Pinterest browser. 


The hoop was my grandmother's.  I think it was for quilts... or embroidery, whatever the case may be, it was a large oval and I saw: 'Easter egg wreath'!!  My daughter saw "basket"! 

I began by separating the two hoops, removing the extra screws and cleaning them up.  I also roughed them up a bit with some sandpaper.


Then I used a paper towel to rub on some white acrylic crafter's paint in a distressed sort of look. The acrylic dries very fast so you don't have to wait to do this project in stages.  If you start with the inner hoop, it will be dry and ready to handle by the time you are done with the outer hoop..... and the outer hoop will be dry and ready to handle by the time you are done embellishing the inner hoop!!  The only exception would be if your wreath is going to be hanging out in the elements, then I recommend a good spray-on sealer at this stage.  You will want to let that dry as-per the can's instructions.


To make the "basket bottom" appearance I used some really great Crafter's tape (you could also use hot glue) and began criss-crossing ribbon in the lower half of the inside hoop. 

I would then cut and secure at each crossing...simply wrapping would create bunching at each side as you switch directions.  You can see it only took a few swipes in each direction to give it that "basket" look.  Once my "basket" was done, I re-attached the outer hoop and tightened the ring.

I chose white paint and ribbon for my "basket" so it would stand out against my blue door.  However, any color you prefer could work well for this project.  The ribbon I used was a 3/4" ribbed white Grosgrain.... however, any ribbon of choice would work well.  Depending on the size of your hoop, I do recommend a size in the 3/4" range though. 


One side of my hoop had extra weight due to the tension block.  To counter-balance this, I attached the sign slightly off to the opposite side.  I did re-open the hoop briefly to slide the sign's hanging ribbon through and then re-tightened.  The hanging ribbon had a knot in the end which allowed it to anchor securely in place without sliding back through.  If unsure, however, you could put a bit of glue on the spot to hold it.  I did add some hot glue to the back of the top right corner of the picture in order to secure it at the desired angle.


Next, I clipped my flower bunches to within an inch of the base, leaving them as a bunch.  I bent the bloom heads to face out instead of up.  I placed the bunches loosely climbing up the side of my "basket" form and, once I was happy with their placement, I hot-glued them in place.  I added an additional bunch to the opposing corner as well to give it some aesthetic balance.

Bows and other trinkets could be added, however, the look I hoped for seemed well achieved at this point.  All-in-all I believe it took under 1 hour to complete, start-to-finish.  I was filming the process for Instagram (which is in my saved stories) so it took a bit longer than if I had just set into it.

Have you made any Easter-ish or spring wreaths to welcome visitors to your home?

Blessings,


Next week I plan to share my other Saturday project:
Cute Easter garland!  The template for which is in this month's newsletter.  Info on how to subscribe is below.  The latest issue will make its way to you when you sign up!


You can click here to see some of the great blogs I am linking up today ...


*Are you subscribed to my FREE monthly newsletter?  You might want to be.  Why?  Well, the newsletter contains bonus material you won't find on the website... not to mention, in those busy months when I can't get regular blog articles up, you can count on this periodical popping up in your email in-box each last Thursday with all new content!  What exactly does the newsletter contain?
  • Encouraging articles on Faith, Home(making), and Homeschool
  • Free printables under different themes each month
  • Insider info on the latest goings-ons with all things on my blog and writing related
You won't find all this great bonus material on the blog so be sure to sign up so you don't miss out!  It's Ok, hop over real quick, right there to your right, see it on my sidebar where it says, "Subscribe to my Newsletter" with a  picture of the "Faith and Home Times" logo above it?  Ok, now enter your email in the box labeled "email address" then click "Subscribe"....(don't worry, it doesn't hurt and I promise not to spam you!). You should receive a confirmation email from me.  

I look forward to sharing Faith and Home Times with you!!